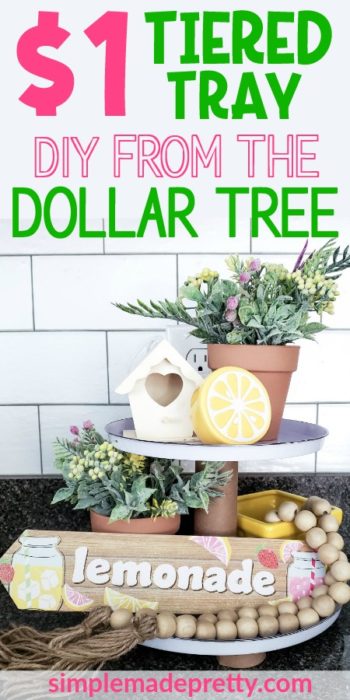
I bet you’ve seen those beautiful farmhouse style tiered trays and you may be wondering how you can DIY a tiered tray using Dollar Store materials. Well, it’s so simple that you might end up addicted to making a 2 tier serving tray that you make a whole bunch for your home! Learn how to make a tiered tray for just a $1 with this Dollar Tree hack!
–>>This post on Instagram has been very popular with my readers and shows how to make a tiered tray for just $1!
I love it when inspiration strikes when I’m shopping at Dollar Tree. I came across some burner covers and thought they would be perfect to use at a tiered tray DIY since they come in a package of 2 with one slightly larger than the other. If you’re a fan of tiered tray ideas and tiered tray styling, you will love this post with this DIY dollar store tiered tray!
Tiered trays have become all the rage over on Instagram. I feel like everyone has a tiered tray in their home decor already, but if you don’t, you will love this easy tiered tray DIY. I learned how to make a tiered tray from inspecting my own farmhouse tiered tray (that I paid $40 for back in 2014). You may have seen the over-priced hobby lobby tiered trays but I’m here to tell you that you don’t need to over-pay for a tiered tray because tiered trays are simple to DIY and look just as good at the expensive tiered trays!
How to make a $1 tiered tray
This #5minute craft is so fun and can be made in minutes for less than $1!
Supplies:
- Dollar Tree burner covers (comes in 2-pack for $1)
- Cardboard tube (mine is the insert from Cricut Vinyl rolls)
- Glue gun
- Black sharpie (to give it that farmhouse look)
- Paper cutter or sharp scissors
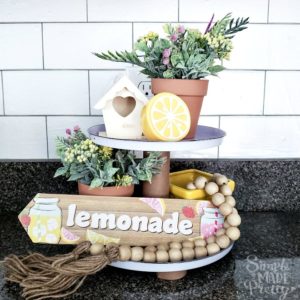
- Everything pictured on the tray at the end of the video was all $1 each too!
Directions:
- Gather Supplies. I used a 2-pack of Dollar Tree burner covers for $1 total.

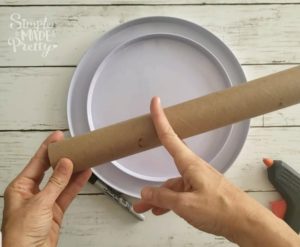
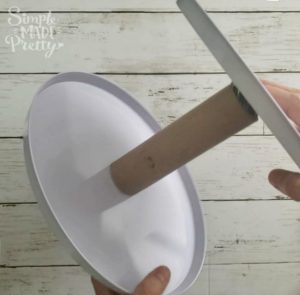
- Cut the cardboard tube in half.
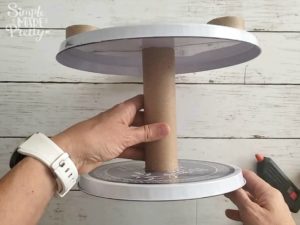
- Use a glue gun to attach the top and bottom of the cardboard tube to the middle of the burner covers.
- You want to glue them so you have a tray on the top and bottom with the white side on top and design on the bottom.
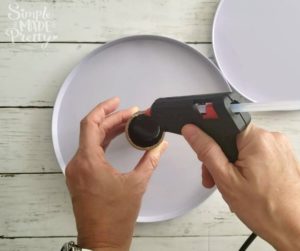
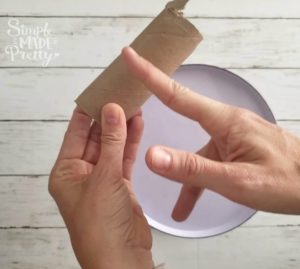
- Cut 3 small”feet” from the tube.
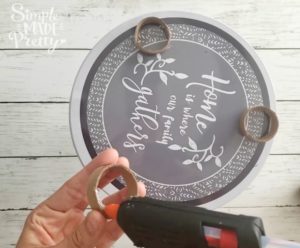
- Glue gun the feet to the bottom of the tray.
- You can leave the “feet” off and paint the entire thing if you want but I left mine as is.
Happy Crafting! ????
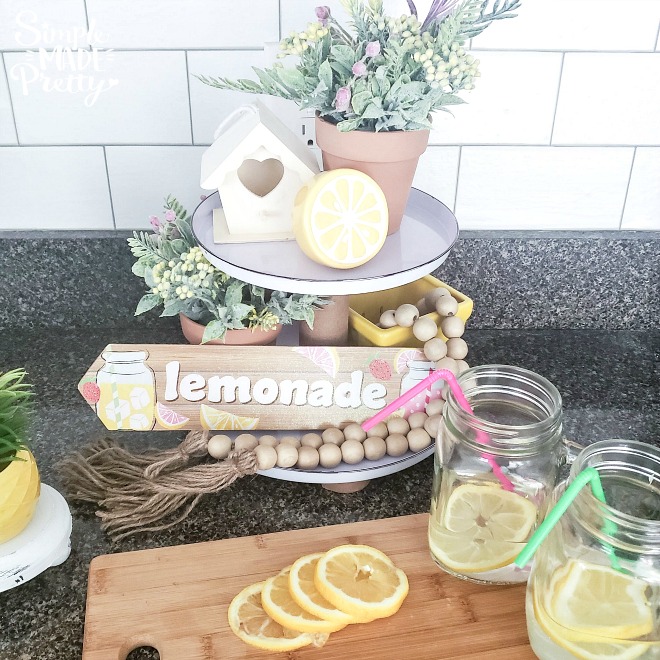
I hope you enjoy making this DIY tiered tray from the Dollar Store! This farmhouse style tiered tray was so easy to make that you can easily make a tiered tray to organize items in the bathroom, a tiered tray for makeup, a tiered tray for craft supplies, and a tiered tray to organize kid’s school supplies!

I plan to style this tiered tray for fall, spring, Easter but this tiered tray can be used as a centerpiece and as a tiered tray for a wedding. Some other ideas to use this DIY tiered tray is for an afternoon tea party, a cupcake tiered tray or display your favorite Rae Dunn items on this tiered tray!
Did you make this tiered tray or a similar one? I would love to see them! Send me a picture on Facebook, Instagram, or email and I’ll share with my followers 🙂
Watch the How-To Video:
Want to see more Dollar Tree DIY videos?
–>>Subscribe to my YouTube channel here!????
Check out my YouTube channel with 3 of my favorite Dollar Tree DIY’s that I use in our kitchen. These items are useful and cute for easy Kitchen decor!

–>>Go here to watch the video to learn how to make all 3 Kitchen decor items for under $6 total!
Print the instructions…
$1 Tiered Tray Dollar Tree DIY
Equipment
- E6000 Glue
Supplies
- Dollar Tree burner covers (comes in 2-pack for $1)
- Cardboard tube (mine is the insert from Cricut Vinyl rolls)
- Glue gun
- Black sharpie (to give it that farmhouse look)
- Paper cutter or sharp scissors
- Everything pictured on the tray at the end of the video was all $1 each too
Instructions
- Gather Supplies.
- Cut the cardboard tube in half.Happy Crafting! ????
- Use a glue gun to attach the top and bottom of the cardboard tube to the middle of the burner covers.
- You want to glue them so you have a tray on the top and bottom with the white side on top and design on the bottom.
- Cut 3 small"feet" from the tube.
- Glue gun the feet to the bottom of the tray.
- You can leave the "feet" off and paint the entire thing if you want but I left mine as is.
Pin it for later…
You might also like…


Psssssttt…Right now I’m offering FREE access to our Digital Resource Library to all of our newsletter subscribers. Your private access includes dozens of free printable crafts, home decor and organization guides. Hurry up and grab your freebies here! (Access instructions are sent after subscribing).
Disclaimer: This post may contain affiliate links or a sponsored post. All opinions are always 100% mine and I don’t partner with any product or company that I don’t use and love. Please see our Full Disclosure for more information.

 DIY Reverse Canvas Dollar Tree Sign
[…] And while the tiered tray I noted above can be a little pricey, you can create the look for a whole lot less. My friend Melanie over at Simple Made Pretty created the idea behind this tiered tray that I am sharing with you. I have taken her idea and added to it a fun twist and handles! You can check her hers out here. […]