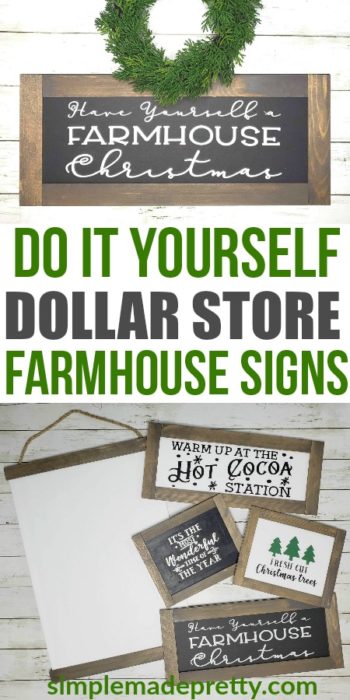
DIY Dollar Tree Farmhouse Signs (Easy Budget Home Decor That Looks High-End)
Want farmhouse-style home decor without paying farmhouse prices? These DIY Dollar Tree farmhouse signs prove you don’t need expensive materials or professional tools to create decor that looks custom, cozy, and intentional.
If you’ve ever walked through Target, Hobby Lobby, or Pottery Barn and thought “I could make that” — you’re right. These easy Dollar Tree sign ideas are perfect for busy moms, beginners, and anyone decorating on a budget.

This post was first published on November 2, 2018.
🔽 WATCH ON YOUTUBE 🔽
🎥 Watch the 5-minute video above — then scroll for more freebies, links & resources below!
In case you are in a hurry…
Why Dollar Tree Farmhouse Signs Are So Popular Right Now
Farmhouse decor continues to trend because it’s:
- Neutral and timeless
- Easy to mix with seasonal decor
- Budget-friendly when DIYed
The problem? Store-bought farmhouse signs can cost $20–$60 each.
The solution?
👉 Dollar Tree supplies + simple DIY techniques = signs that look boutique for just a few dollars.
Supplies You Can Find at Dollar Tree
You don’t need anything fancy for these projects. Most items can be found at Dollar Tree or are things you already have at home.
- Wooden plaques & signs
- Canvas panels
- Foam board
- Craft paint (white, black, neutral tones)
- Paint brushes or sponge brushes
- Vinyl decals or stencils
- Hot glue or craft glue
Optional upgrades: sandpaper, acrylic sealer, Cricut machine for vinyl lettering.
I’m frugal so I got creative and made these amazing farmhouse signs using Dollar Store supplies and was IN-LOVE with how they turned out. I knew I had to share this idea with others… If you don’t have a lot of money to spend on home decor or don’t have access to tools and supplies to build your own wooden farmhouse signs, you are going to LOVE this tutorial.
My favorite online resource to find SVG files to make Cricut craft projects is DesignBundles.net!

–>>Click here to see the latest bundle with the best SVG files online!
The only other thing that I used that you may not own is my Cricut Machine. In the video below I share how I used my Cricut machine to cut vinyl images which I used as a paint transfer and I just applied the vinyl directly to the foam board.
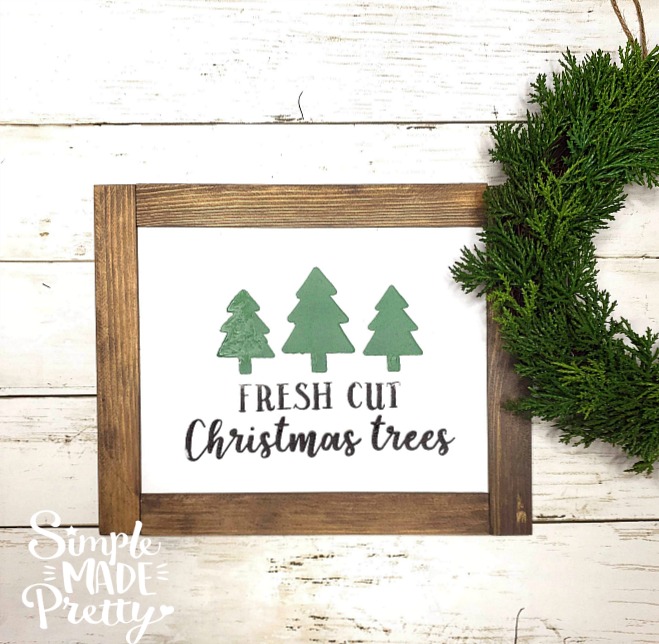
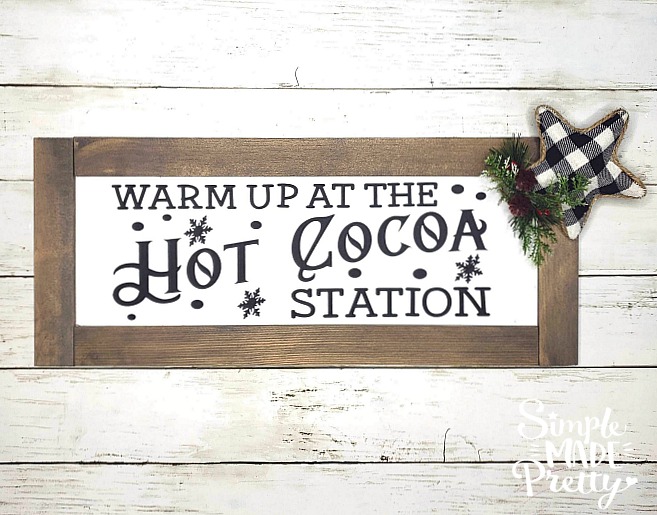
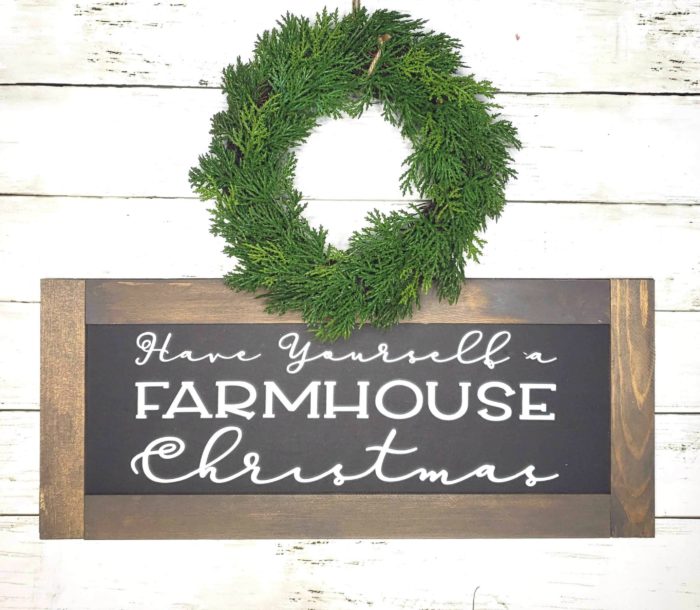
The SVG images used on my signs are from DesignBundels.net. I chose Christmas designs since I’m getting ready to decorate for the holidays but you can make these using any design!
A few other ways around using a Cricut machine are:
- Download your favorite image, print, and cut by hand
- Use a Stencil
- Hand-letter or draw the image by hand
- Ask a friend with a Cricut/Silhouette machine to cut a decal for you
- Print your favorite image and glue to the foam board, then frame over the top so you don’t see it’s printed
- KEEP SCROLLING TO SEE AN UPDATED VERSION OF THESE SIGNS USING DOLLAR TREE SUPPLIES!
I know those ideas will not yield the same result as the signs shown in this post, however, you might be surprised!
If you are thinking about getting a Cricut machine, the #1 question I get asked ALL the time is which machine to buy. I always recommend the Cricut Explore Air 2. My friends are always sending me second-hand sales listings of OLD Cricut machines (and I mean VINTAGE, lol) and ask if those are good machines. The Cricut Explore, Cricut Explore Air, and Cricut Explore Air 2 are all great starter machines.
Cricut Basics
–>>If you want a Circut Machine but aren’t sure which machine is for you, be sure to read this post, How to Choose Which Cricut Machine is Right for you.
–>>If you’ve had your Cricut machine for some time but are scared to use it, you should try these 32 Easy Cricut Projects for Beginners.
–>>Want more tips on finding inexpensive Cricut supplies? Read this post, How to Save Money on Cricut Craft Supplies.
****Update: Since I was the first to share this Dollar Tree hack in 2018, thousands of others have recreated their own versions and made affordable signs to decorate their homes 🙂
Please tag @simplemadepretty when you share your creations inspired by me to keep Simple Made Pretty going.
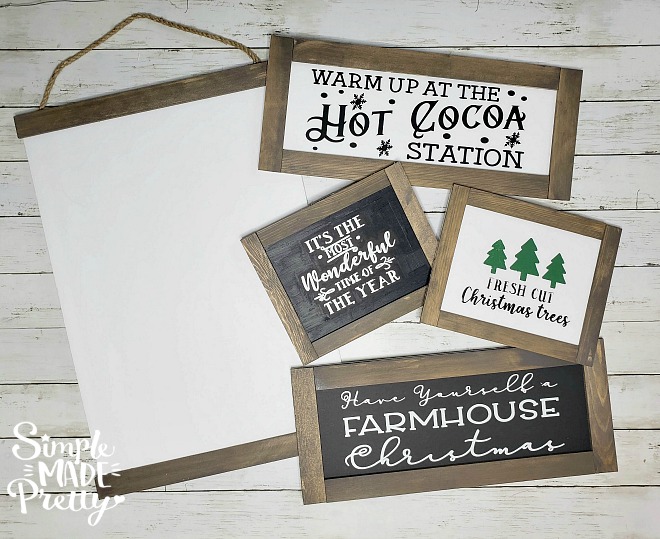
Here are a few seasonal signs I’ve made using this method!
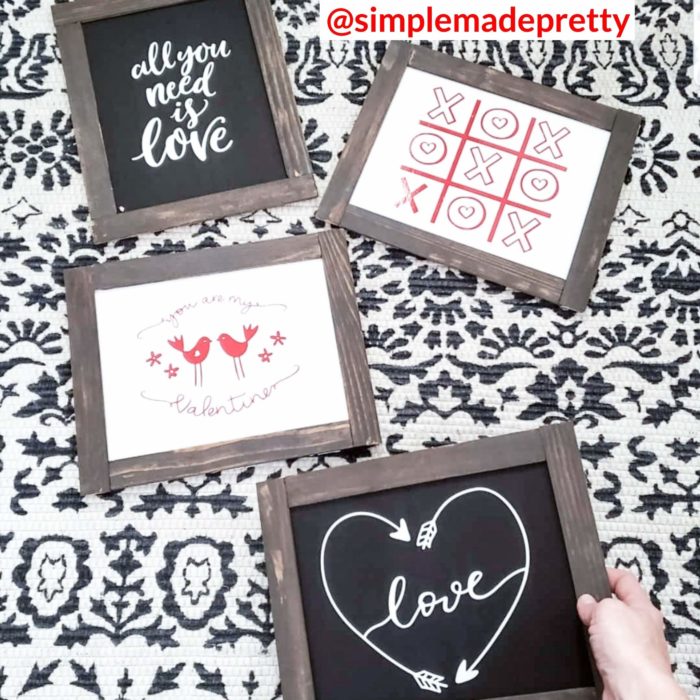
Valentine’s Day Dollar Store Farmhouse Signs
–>>Go here to see more Dollar Store Valentine’s Day DIY Ideas!
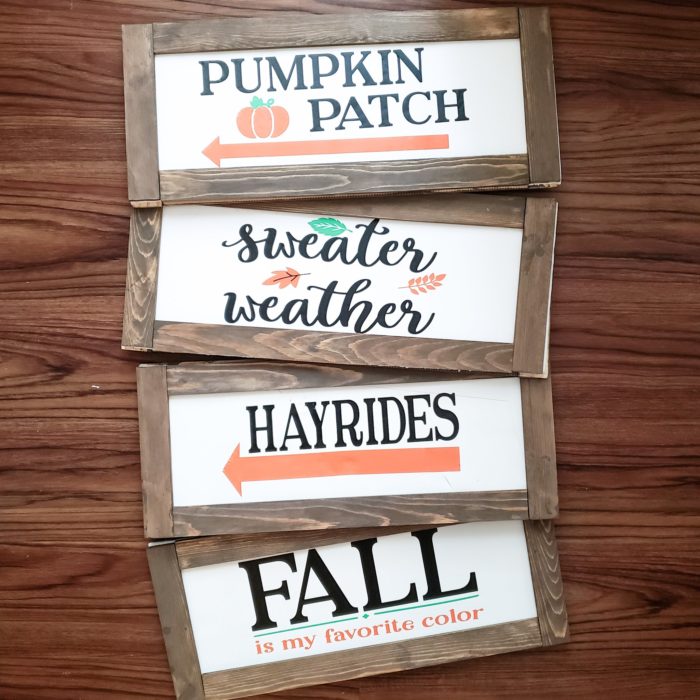
DIY Fall Dollar Store Farmhouse Signs
–>>Go here to see more Fall DIY Dollar Store ideas!
DIY Halloween Dollar Store Farmhouse Signs
–>>Go here to see more Halloween DIY Dollar Store ideas!

How To Make DIY Dollar Store Farmhouse Signs:
Get ready to make some fun and inexpensive Dollar Store signs!
Supplies:
- Dollar Tree Foam Board (you can use both white and black foam boards)
- Box Cutter
- (4) 5-Gallon Paint Sticks
- Circular Saw/Hand Saw (OR you can use the saw in Home Depot)
- Wood Stain
- Aleene’s Tacky Glue
- Rope (optional – if you are making the “scroll” version)
- Cricut Explore Machine (optional if you want to DIY your own images)
- Paint/Vinyl (optional if you want to DIY your own images)
Directions:
- Gather supplies.
- Cut the paint sticks to remove the curved edge. I used a saw at home but Home Depot has a free cut station in the molding section where you can cut the paint sticks, then purchase 🙂 To make a traditional sign (with all 4 sides framed) you will need to cut 1 paint stick by half.
- Stain the paint sticks. I used Briar Smoke stain.
- Once the stain is dry, use the paint sticks as a guide to determine the size of your sign and cut the foam board.
- I cut the foam boards based on the size of the paint sticks once they were cut. The large sign is approximately 17 x 25 inches. The long sign is approx. 19 x 8.5 inches and the small sign is approx. 11 x 9 inches.
- Use a box cutter to cut the foam board. You can place another foam board beneath it so you don’t cut the surface you are working on.
- Use Tacky glue to attach the paint sticks to the top and bottom of the foam board (if making the “scroll” sign) and attach to all 4 sides if making a traditional sign.
- I used tacky glue and a staple gun to attach the rope at the top of the “scroll” sign so I could hang it. If making a traditional frame with 4-sides, you can use a picture frame hook or a sawtooth hanger to hang the sign. Or leave it without a hook and sit on a table 🙂
Tips to Make Dollar Tree Signs Look High-End
- Stick to neutral colors (white, cream, black, greige)
- Lightly sand edges for a worn farmhouse feel
- Use fewer words — simple phrases look more expensive
- Seal finished signs with a matte spray for durability
These small details make a huge visual difference.
Who These DIYs Are Perfect For
✔ Busy moms who want quick wins
✔ Beginner DIYers
✔ Renters
✔ Anyone decorating on a tight budget
✔ Dollar Tree + farmhouse decor lovers
I hope you enjoyed this DIY Dollar Store Farmhouse Sign tutorial! I’m so excited to make more of these signs!
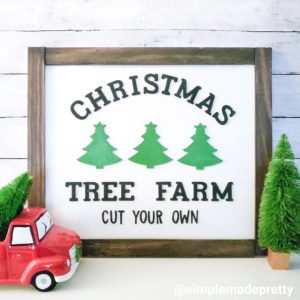
Here is a recent Dollar Tree Christmas Sign that I made using Dollar Tree wooden Letters and trees! This video has been very popular on Instagram so I thought I’d share on here as well 🙂
Want to see the detailed instructions to make this Christmas sign? Check out my Membership website for more!!
Watch the How-To Video for the Christmas Tree Farm Sign and Print the Instructions:
DIY Dollar Store Farmhouse Signs
Equipment
- Dollar Tree Foam Board
- Box Cutter
- Large Paint Sticks (found mine in the paint section at Home Depot 3/$1)
- Circular Saw/Hand Saw (OR you can use the hand saw in Home Depot)
- Wood Stain (I used Briarsmoke by Rustoleum)
- Aleene's Tacky Glue
- Cricut Explore Machine (optional if you want to DIY your own images)
- Paint/Vinyl (optional if you want to DIY your own images)
Instructions
- Gather supplies.
- Cut the paint sticks to remove the curved edge. I used a saw at home but Home Depot has a free cut station in the molding section where you can cut the paint sticks, then purchase 🙂 To make a traditional sign (with all 4 sides framed) you will need to cut 1 paint stick by half.
- Stain the paint sticks using a foam brush, rags, and gloves. I used Briarsmoke Rustoleum wood stain.
- Once the stain is dry, use the paint sticks as a guide to determine the size of your sign and cut the foam board.
- I cut the foam boards based on the size of the paint sticks once they were cut. The large sign is approximately 17 x 25 inches. The long sign is approx. 19 x 8.5 inches and the small sign is approx. 11 x 9 inches.
- Use a box cutter to cut the foam board. You can place another foam board beneath it so you don't cut the surface you are working on.
- Use Tacky glue to attach the paint sticks to the top and bottom of the foam board (if making the "scroll" sign) and attach to all 4 sides if making a traditional sign.
- I used tacky glue and a staple gun to attach the rope at the top of the "scroll" sign so I could hang it. If making a traditional frame with 4-sides, you can use a picture frame hook or a sawtooth hanger to hang the sign. Or leave it without a hook and sit on a table.
Video
Wrap Up about the Easy DIY Dollar Tree Farmhouse Signs
In this Dollar Store Farmhouse Signs post, I give easy-to-follow instructions that will help you create your own Farmhouse-style wooden sign! I share what materials we used. Get the look for less with this easy-to-follow guide to Dollar Store Farmhouse signs. The simple, cheap decorating idea transforms many rooms.
Other Popular Dollar Tree Posts:
Here are related posts that you might like!
DIY Burlap Baskets using Plastic Dollar Store Bins
Tidy up your home with some DIY Burlap Baskets using Plastic Dollar Store Bins! These DIY Dollar Store baskets are simple to make using basic supplies from the Dollar Tree but look like they are from Pier One! If you are looking for storage baskets from the Dollar Store but don’t like the plastic baskets, try this burlap fabric DIY project!
Over The Door Organizer Dollar Tree DIY
Learn how to make a cute and functional over-the-door organizer that I made using Dollar Tree supplies. I shared this over the door organizer shown in our pantry on Instagram and YouTube recently and I knew it would be pretty popular (because I was also in love with how it turned out!) so I wanted to share this tutorial on my blog as well. This back of the door storage organizer is made with Dollar Tree supplies. I’m also giving my readers some FREE Printable Pantry labels and Blank Labels in this post!
–>>Keep reading to learn how to make this Over The Door Organizer Dollar Tree DIY!
Dollar Tree Farmhouse Wall-Mounted Mug Rack DIY
DIY these popular farmhouse mug racks made using Dollar Tree supplies! I shared these DIY wall mug racks on Instagram and I knew they would be pretty popular (because I was also in love with how they turned out!) so I wanted to share this tutorial on my blog as well. These mug racks are made with Dollar Tree supplies.
–>>Keep reading to learn how to make this Dollar Tree Farmhouse Wall-Mounted Mug Rack DIY!
DIY Dollar Store Farmhouse Ladder
If you’ve seen those farmhouse ladders used for various home decor ideas, you probably know how much they cost in high-end decor stores. I got lucky and found a large antique ladder at a yard sale but I wanted an extra farmhouse ladder to use as a planter outside so I made my own! The best part about this DIY farmhouse ladder is that it’s made using items for less than a few dollars! This ladder was so easy that I made a mini tea towel ladder (yes, tea towel ladders are a thing!) for just $3!
–>>Keep reading to learn how to make a DIY Farmhouse Ladder For $3!
$1 Tiered Tray DIY
I bet you’ve seen those beautiful farmhouse style tiered trays and you may be wondering how you can DIY a tiered tray using Dollar Store materials. Well, it’s so simple that you might end up addicted to making a 2 tier serving tray that you make a whole bunch for your home!
–>>Learn how to make a tiered tray for just a $1 with this Dollar Tree hack!
Did you make these signs or similar ones? I would love to see yours! Send me a picture on Facebook, Instagram, or email and I’ll share with my followers 🙂
Save this Dollar Store Farmhouse Signs tutorial to your favorite Pinterest Board!
Psssssttt…Right now I’m offering FREE access to our Digital Resource Library to all of our newsletter subscribers. Your private access includes dozens of free printable crafts, home decor and organization guides. Hurry up and grab your freebies here! (Access instructions are sent after subscribing).
Disclaimer: This post may contain affiliate links or a sponsored post. All opinions are always 100% mine and I don’t partner with any product or company that I don’t use and love. Please see our Full Disclosure for more information.
 DIY Card Catalog Ikea Dresser Hack
[…] Woodman Crafts Paint Sticks – 9 Inch Premium Grade Wood Stirrers MADE IN USA – Use For Wood Crafts (I also use these paint sticks to make Dollar Store Farmhouse Signs! Check them out here!) […]