Dollar Store DIY Wood Tray
Want to create high-end farmhouse decor without paying boutique prices?
This DIY wooden farmhouse tray is one of the most recreated projects from my early blogging days. It’s simple, affordable, and completely customizable — making it perfect for styling coffee tables, kitchen counters, entryways, or seasonal displays.
You don’t need advanced woodworking skills. Just a few basic supplies and an afternoon.

🔽 WATCH ON YOUTUBE 🔽
🎥 Watch the 9-minute video above — then scroll for more freebies, links & resources below!
What wood should I use for a farmhouse tray?
Pine boards or pre-cut craft wood from home improvement stores work well for beginners.
How do you make tray handles sturdy?
Attach handles using wood screws and pre-drill holes to prevent splitting.
Can I stain or paint a farmhouse tray?
Yes. Use wood stain for a rustic look or chalk paint for a distressed farmhouse finish.
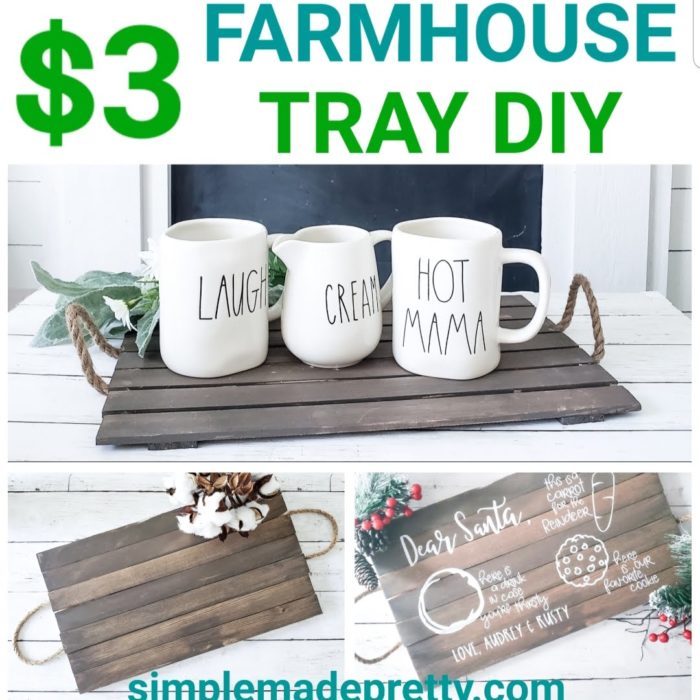
DIY Wooden Farmhouse Tray
This $3 DIY farmhouse tray turned out so good! It’s going to look great hanging on the wall (like a sign) when not in use! I’ve used this little DIY farmhouse tray in so many different ways… it really is very versatile!
Funny story, my hubby came home and saw this farmhouse tray in our kitchen and seriously thought I bought it. I told him I made it and cut the wood myself… and he was shocked! He bought me a hand saw for Christmas bc I usually ask him to cut everything for me with his electric saw (I’m not 100% confident using his machines solo…yet) and this was my first time using the hand saw.
This DIY Farmhouse Tray was only $3 and 1 hour to make (including dry time) if you use a hand saw as I did.
Supplies:
- Large (5 gallons) paint sticks (I used 9 total sticks)
- Rope from
- Briar smoke wood stain
- Aleene’s tacky glue
- I recommend a staple gun too????
Instructions:
- Arrange 7 sticks in a row with the numbers facing upward.
- Use the 2 remaining sticks to glue the 7 sticks together.
- Let the glue dry.
- Use a hand saw or table saw to cut the curved edge off the side and trim the 2 supporting paint sticks.
- Use your desired color paint or wood stain on the tray and let dry.
- Use the rope to create handles for the sides of the tray.
- Glue the rope to the bottom of the tray (optional: a staple in place with a staple gun to secure).
- Add a decal if you desire and enjoy!
Supplies
- Large (5 gallons) paint sticks (I used 9 total sticks)
- Rope from
- Briar smoke wood stain
- Aleene's tacky glue
- I recommend a staple gun too
Instructions
- Arrange 7 sticks in a row with the numbers facing upward.
- Use the 2 remaining sticks to glue the 7 sticks together.
- Let the glue dry.
- Use a hand saw or table saw to cut the curved edge off the side and trim the 2 supporting paint sticks.
- Use your desired color paint or wood stain on the tray and let dry.
- Use the rope to create handles for the sides of the tray.
- Glue the rope to the bottom of the tray (optional: a staple in place with a staple gun to secure).
- Add a decal if you desire and enjoy!
I used my Cricut machine to add a decal to the bottom of my first tray.
I also made a double-sided tray that is white on one side and stained on the other. I added decals to this double-sided tray.
I used the same double-sided tray for these Cookies for Santa Trays!
–>>Find the tutorial to make the double-sided farmhouse tray on Simple Made Pretty Members.
I hope you enjoy making this farmhouse tray!
Did you make this Farmhouse Tray or similar ones? I would love to see yours! Send me a picture on Facebook, Instagram, or email and I’ll share with my followers
Wrap Up
There’s something so satisfying about turning a few simple boards into a piece of decor that looks like it came from a boutique. This DIY wooden farmhouse tray proves you don’t need a big budget or advanced woodworking skills to create something beautiful and functional for your home. Whether you style it on a coffee table, kitchen counter, or entryway, this tray is one of those timeless pieces you’ll use year after year. If you love easy, budget-friendly projects like this, be sure to explore more farmhouse DIYs here on Simple Made Pretty — and don’t forget to check out the printable bundles and exclusive projects inside Craft & Create Club for even more creative inspiration.
Other Popular Dollar Tree Posts:
DIY Burlap Baskets using Plastic Dollar Store Bins
Tidy up your home with some DIY Burlap Baskets using Plastic Dollar Store Bins! These DIY Dollar Store baskets are simple to make using basic supplies from the Dollar Tree but look like they are from Pier One! If you are looking for storage baskets from the Dollar Store but don’t like the plastic baskets, try this burlap fabric DIY project!
Over The Door Organizer Dollar Tree DIY
Learn how to make a cute and functional over-the-door organizer that I made using Dollar Tree supplies. I shared this over the door organizer shown in our pantry on Instagram and YouTube recently and I knew it would be pretty popular (because I was also in love with how it turned out!) so I wanted to share this tutorial on my blog as well. This back of the door storage organizer is made with Dollar Tree supplies. I’m also giving my readers some FREE Printable Pantry labels and Blank Labels in this post!
–>>Keep reading to learn how to make this Over The Door Organizer Dollar Tree DIY!
Dollar Tree Farmhouse Wall-Mounted Mug Rack DIY
DIY these popular farmhouse mug racks made using Dollar Tree supplies! I shared these DIY wall mug racks on Instagram and I knew they would be pretty popular (because I was also in love with how they turned out!) so I wanted to share this tutorial on my blog as well. These mug racks are made with Dollar Tree supplies.
–>>Keep reading to learn how to make this Dollar Tree Farmhouse Wall-Mounted Mug Rack DIY!
DIY Dollar Store Farmhouse Ladder
If you’ve seen those farmhouse ladders used for various home decor ideas, you probably know how much they cost in high-end decor stores. I got lucky and found a large antique ladder at a yard sale but I wanted an extra farmhouse ladder to use as a planter outside so I made my own! The best part about this DIY farmhouse ladder is that it’s made using items for less than a few dollars! This ladder was so easy that I made a mini tea towel ladder (yes, tea towel ladders are a thing!) for just $3!
–>>Keep reading to learn how to make a DIY Farmhouse Ladder For $3!
$1 Tiered Tray DIY
I bet you’ve seen those beautiful farmhouse style tiered trays and you may be wondering how you can DIY a tiered tray using Dollar Store materials. Well, it’s so simple that you might end up addicted to making a 2 tier serving tray that you make a whole bunch for your home!
–>>Learn how to make a tiered tray for just a $1 with this Dollar Tree hack!
Watch the How-To video
Check out my YouTube channel with 3 of my favorite Dollar Tree DIY’s that I use in our kitchen. These items are useful and cute for easy Kitchen decor!

–>>Go here to watch the video to learn how to make all 3 Kitchen decor items for under $6 total!

Psssssttt…Right now I’m offering FREE access to our Digital Resource Library to all of our newsletter subscribers. Your private access includes dozens of free printable crafts, home decor and organization guides. Hurry up and grab your freebies here! (Access instructions are sent after subscribing).
Disclaimer: This post may contain affiliate links or a sponsored post. All opinions are always 100% mine and I don’t partner with any product or company that I don’t use and love. Please see our Full Disclosure for more information.
DIY Paint Stir Stick Wood Tray
 6 DIY Father’s Day Cricut Gift Ideas From The Dollar Store