Equipment
- Table Saw (or take the measurements to Home Depot and have them cut it)
- Miter Saw for smaller cuts (or take the measurements to Home Depot and have them cut it)
- Air Strike Nailer (alternatively you can use small nails and a hammer)
Supplies
- 4' x 8' piece of plywood (19/32 of an inch thickness... or just over 1/2 inch thick)
- Underlayment or other scrap wood for trim/design detail
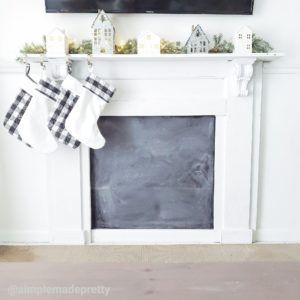
- 2 Corbels (ours are from Hobby lobby but these will work too)
- Gorilla Wood Glue
- Paint or Stain
- Paint Brushes or Sponge Brush
- Wood Putty
- Rags
- Screw(s) to attach to the wall
Instructions
- Gather Supplies. Please watch the video below with more instructions and pictures!
- Have Home Depot cut the plywood in half while in the store. They should provide this cut for free but I've heard how many cuts and how small you want things cut depend on the employee you get that day :(
- If you are having Home Depot cut the remaining pieces for you (again, I'm not sure if they will charge you for this) then give them the measurements and have them cut.
Use a table saw to cut a 12 x 49.2-inch piece from the plywood (this is the top piece).
Cut (2) 10 x 30.25-inch pieces from the plywood (these are the side pieces). - Then you need to cut some wood to frame the back of the fireplace so your fireplace wraps around the baseboards in your home. You will need to measure how tall your baseboards are to determine how much space to leave on the bottom backside of your fireplace. Our baseboards are 3.25 inches, so we build a frame on the back with 3.25 inches open at the bottom. Make sure you have these measurements if you are getting Home Depot to cut the wood.
- Use the leftover plywood to cut 3-inch strips for each side on the back of the fireplace. Remember to leave the space for your baseboards at the bottom. These strips will also hold the entire frame together.
- Use Gorilla Glue to attach the strips together then use an Air Strike Nailer to attach the strips to the back. One tip my hubby gave me when using Gorilla Glue is to spread the glue on, attach the two pieces, then lift the pieces apart to get oxygen in the glue (which will help adhere better).
- Now you are ready to flip the fireplace over and start designing the front (this is the fun part!).
- We used leftover underlayment (very thin plywood) and cut 2 strips for each side of the fireplace (one was 6 inches wide and the other was 2 inches wide). For the fake fireplace in our family room, the design was a bit more detailed because we added molding and baseboards at the bottom. The design you choose will depend on how good you are with woodworking and what type of scrap wood you have to work with. Designing a unique fireplace can be fun though so have fun!
- Once you have the design you like, start gluing and using the Air Strike Nailer to attach the design to the frame.
- Use glue and the Air Strike Nailer to attach the corbels.
Now you are ready to add the top mantel! This is another fun part because you can get creative with really thick pieces of wood, reclaimed wood, and more! We ended up using a 2" x 10" x 8' piece of wood that we cut to 52 inches long (so it's 2" x 10" x 52" mantel). Cut the mantel to your desired length. - Use Gorilla Glue and the Air Strike Nailer to attach the edge of the mantel to the fireplace.
Now you are ready to attach it to your wall! - If possible, try to attach the fireplace to a stud in the wall. There are many ways to attach but we ended up attaching 1 large screw in the center which went into a wall stud.
Cover the screws or nails with wood putty. - Paint or stain the fireplace as desired. I painted the faux fireplace in our family room with Rustoleum's Linen Chalked Paint. I stained the faux fireplace in our bedroom with Varathane Briarsmoke Wood Stain.
Video
Did you make this project?Mention @simplemadepretty or tag #simplemadepretty!